You can add columns in a table manually and enter technical and business properties of a column. You can also use user defined fields to enter additional properties of the column. UI labels of user defined fields can be configured in Language Settings.
To add columns in tables manually, follow these steps:
- Go to Application Menu > Data Catalog > Metadata Manager > Explore.
- On the Explore tab, click an environment tile to view its details and tables.
- In the Data Catalog pane, click a table to see its columns.
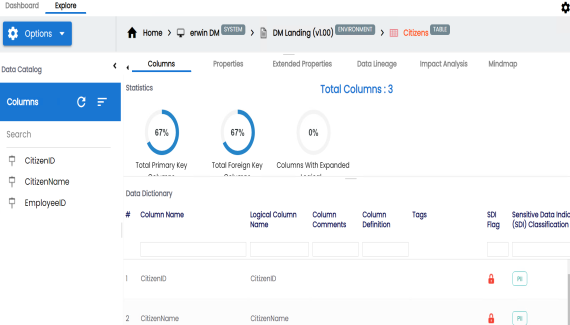
- Click Options.
The available options appear.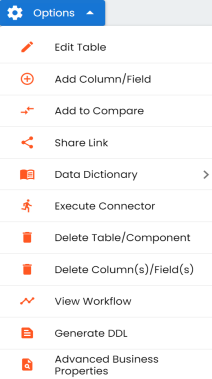
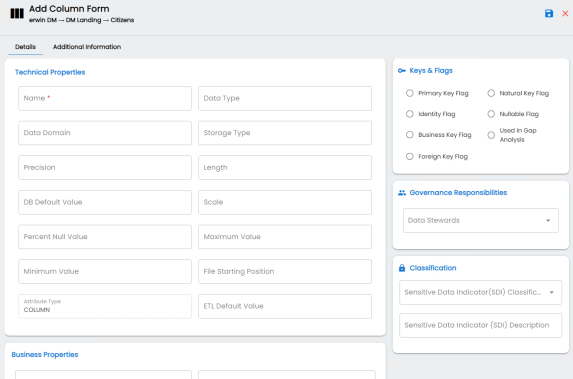
- Click Add Column/Field.
- Enter or select appropriate values in the fields. Refer to the following table for field description.
-
Foreign Key Table Name: Specifies the actual table name where the column is listed as a PK (in case of the current column being an FK).
-
Foreign Key Column Name: Specifies the actual column name where the column is listed as a PK (in case the current column being an FK).
- Click
 .
.
The Add Column Form appears.
|
Field Name |
Sub-Field |
Description |
|---|---|---|
|
Technical Properties |
Name |
Specifies the physical name of the column. For example, Object_ID. |
|
Data Type |
Specifies the physical data type of the column. For example, varchar. |
|
|
Data Domain |
Specifies the data domain values for the column. For example, data domain of a Gender column is M and F. |
|
|
Storage Type |
Specifies the storage type of the column. For example, row store/column store in the case of SAP systems. |
|
|
Precision |
Specifies the precision of the column. For example: 5, the number 123.45 has a precision of 5 and a scale of 2. |
|
|
Length |
Specifies the physical length of the column. For example, if the column datatype is char(5), then its physical length is 5. |
|
|
DB Default Value |
Specifies the default value of the column in the database. For example, True. |
|
|
Scale |
Specifies the physical scale of the column. For example: The number 123.45 has a precision of 5 and a scale of 2. |
|
|
Percent Null Value |
Specifies the percentage of null values in the column. For example, 10%. |
|
|
Maximum Value |
Specifies the maximum value of the column. For example, maximum value of ID column can be 1503. |
|
|
Minimum Value |
Specifies the minimum value of the column. For example, minimum value of ID column can be 424. |
|
|
File Starting Position |
Specifies the starting position in the file. |
|
|
Attribute Type |
Specifies the attribute type of the new component. It is autopopulated with Column. |
|
|
ETL Default Value |
Specifies the default ETL value of the column during the load process. |
|
|
Business Properties |
Logical Name |
Specifies the logical name of the column. For example, if the physical name of the table is CUST_ID_NUM, then the logical name of the table is Customer Identification Number. |
|
Definition |
Specifies the definition of the column. For example: The column is a primary key that allows 5 alpha-numeric characters. |
|
|
Expanded Logical Name |
Specifies the expanded logical name of the column. For example, if the physical name of the column is Resource_ID, then the logical name of the . You can also configure expanded logical name of columns in bulk at system and environment level. |
|
|
Comments |
Specifies the comments about the column. For example: The column provides unique identification of employee in the employee table. |
|
|
JSON Physical Column Name |
Specifies the JSON physical name of the column if the column is in a JSON environment. For example, objectID. |
|
|
Class |
Specifies the column class property. Select a column class. For more information on configuring column class, refer to the Configuring Table and Column Class topic. |
|
|
Alias |
Specifies the alias name of the column. For example, Resource_ID. |
|
|
Keys & Flags |
Primary Key Flag |
Specifies whether the column is a primary key. Select the check box if the column is used as the primary key. |
|
Natural Key Flag |
Specifies whether the column is a natural key. Select the check box if the column is a natural key. |
|
|
Identity Flag |
Specifies whether the column is used as an identity flag. Select the check box if the column is used as an identity flag. |
|
|
Nullable Flag |
Specifies whether the column allows null values. Select the check box if the column allows null values. |
|
|
Business Key Flag |
Specifies whether the column is a business key. Select the check box if the column is a business key. |
|
|
Used in Gap Analysis |
Specifies whether the column is being used in a gap analysis for usage in mappings. Select the check box if the column is used in the gap analysis. For more information on performing column gap analysis, refer to the Performing Column Gap Analysis topic. |
|
|
Foreign Key Flag |
Specifies whether the column is a foreign key. Select the check box if the column is a foreign key and appears next to this option. Click to add the following: |
|
|
Governance Responsibilities |
Data Steward |
Specifies the data steward responsible for the column. For example, Jane Doe. Users assigned with the Legacy Data Steward role appear as drop down options. You can assign this role to a user in the Resource Manager. To assign data steward, select a data steward from the drop down options. For more information on assigning roles and users, refer to the Updating Data Governance Assignments topic. |
|
Classification |
Sensitive Data Indicator (SDI) Classification |
Specifies the SDI classification of the column. For example, PHI. For more information on configuring SDI classifications, refer to the Configuring Sensitive Data Indicator Classifications topic. |
|
Sensitive Data Indicator (SDI) Description |
Specifies the description of the SDI classification. For example: Protected Health Information. The field autopopulates based on the SDI classification. |
The column is added to the table.
|
Copyright © 2026 Quest Software Inc. |